自製「Chrome 版 Word Wise」智能翻譯英文生字
2018-03-13
這個項目是 用「字頻數據」分析英文生字的難易度 的後續,靈感取自 Amazon Kindle 的 Word Wise,本來打算開發一個 Electron App,但後來發現做一個插件好像比較實際
跟 Google 翻譯的分別﹖
Google 也有自動翻譯功能,而且英譯中其實翻譯得還不錯,為甚麼我還要寫呢﹖
- Google 翻譯會覆蓋掉原文
- 整篇翻譯很常出現莫名奇妙的句子
炫耀技術
p.s. 不過像這樣的文章就沒太大問題
 圖中文章來源: Science Alert
插件功能
簡而言之就是翻譯,方法有三種
1. 雙擊翻譯
這是我最常用的單詞翻譯功能,只要在生字上連按兩下就可以在生字上方加入翻譯

2. 全頁翻譯
這是最初的構思,就像 Amazon 的 Wordwise 一樣在頁面的所有段落上方加插翻譯,為減少誤判一律只翻譯 <p> 和 <li>

3. Highlight 翻譯
全頁翻譯比較花時間而且界面有時候會嚴重變形,所以加上這個只翻譯選取段落的功能

運作原理
這個項目總共有
- 一個翻譯伺服器
- Chrome 和 Firefox 的插件
- Google 翻譯 API
伺服器的運算
提供翻譯 API 給瀏覽器插件,背後用了我寫的 difficulty 模組分析生字難度,翻譯部份用了「免費的」 google-translate-api,啊不過請低調使用…
翻譯 API
difficulty 預設有 3 個等級,最低是 1 最高是 3,而 API 的預設值是 1,即常用字以外的字都會翻譯
POST: /api/translate可用的參數
{
  level: number;
  words: string[];
  lang: string;
}
curl 例子
curl -XPOST -H "Content-type: application/json" -d '{
  "level": 3,
  "words": [ "apple", "cappuccino" ],
  "lang": "zh-tw"
}' 'http://localhost:4000/api/translate'
因為 apple 是常用字,所以只會對 cappuccino 進行翻譯
{
  "cappuccino": "熱奶咖啡"
}
控制界面的瀏覽器插件
我只寫了 Firefox 和 Chrome 的插件,全靠這兩個模組我可以使用一樣的原碼
找生字和插入翻譯是我花了最多時間的部份
從 <p> 和 <li> 找出生字
用 jQuery 抽出選取中的 <p> 和 <li>,移除 stop words 和標點符號後用空格把它們拆成一個 Array,以 I have a pen. I have an apple. 為例子
變成 Array
重覆出現的生字不會在 Array 出現
[
  "I",
  "have",
  "a",
  "pen.",
  "an",
  "apple."
]
移除 stop words 和標點
移除 stop words 後
[
  "pen.",
  "apple."
]
最終會變成這樣
[
  "pen",
  "apple"
]
從 API 取得的 data
假設這兩個都是困難的字,透過 API 取回來的翻譯結果將會是這個格式的
{
  "apple": "蘋果",
  "pen": "筆"
}
運用 CSS 整加行距和插入翻譯
以 apple 作例子,這個插件會把所有 <p> 或 <li> 的 apple 變成
<span data-after="蘋果"" class="ww-trans-word">apple</span>.ww-trans-word 的用途是增加行距和利用 :after 插入從 data-after 讀取的翻譯到生字上方,以下是這個 class 的 CSS
.ww-trans-word {
  position: relative;
  line-height: 3em !important;
}

.ww-trans-word:after {
  content: attr(data-after);
  position: absolute;
  top: -1.8em;
  left: 0;
  width: 200px;
  height: 0;
}
只翻譯選取的段落
找字和翻譯的部份都使用了 JS 的 Selection,先建立一個新的 <div> 然後把選取的內容 clone 到裡面,插入翻譯的方法同上,最後直接把這個 <div> 取代整段選取的字串
addTranslationsToSelection(translations: any, selection: Selection) {

  // Get range and parent element from selection
  const range = selection.getRangeAt(0);
  const parent = selection.focusNode.parentElement;

  // Ingore translated word when single word is selected
  if ($(parent).hasClass('ww-trans-word')) {
    return;
  }

  // Create div and append the origin word(s)
  const div = document.createElement('div');
  div.appendChild(range.cloneContents());

  // Append translations
  let html = div.innerHTML;
  for (let en in translations) {
    const zhtw = translations[en];

    // Condition to check if the word is already translated
    if (html.indexOf(`data-after="${zhtw}"`) === -1) {
      const regexp = new RegExp(`\\b${en}\\b`);
      html = html.replace(
        regexp,
        `<span class='ww-trans-word' data-after='${zhtw}'>${en}</span>`
      );
    }
  }

  // Replace the selection with the div
  range.deleteContents();
  range.insertNode(range.createContextualFragment(html));
}
雙擊翻譯
原理跟譯段落一樣,因為雙擊在瀏覽器會自動選選取字串,所以只要用 jQuery 聆聽 $.dblclick() 事件再觸發翻譯就可以了
本地伺服器和插件開發
下載翻譯伺服器
$ git clone https://github.com/auphone/wordwise-translation-server.git
$ cd wordwise-translation-server
$ npm install
Build 和運行
$ npm run build
$ node dist/index.js
然後下載 extension
$ git clone https://github.com/auphone/wordwise-chrome-extension.git到 Google Chrome => 進入插件頁面 => 在右上角的開發者模組打勾 => 然後載入插件,位置在 ./wordwise-chrome-extension/
使用方法
先根據下面指示設定好插件,然後找一個網頁(最好是文章)按這個插件圖示,然後神奇的事就發生了 ⋯
![]()
插件設定
在插件圖示按右鍵可以找到 Options,是一個很簡陋的頁面 ⋯
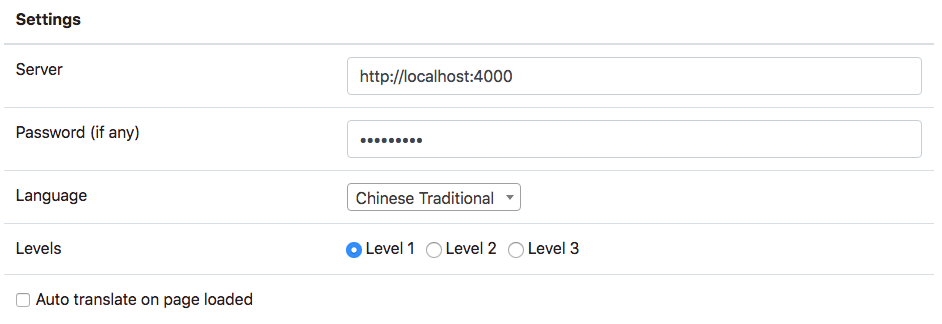
Server - 伺服器
- 輸入翻譯伺服器的 URL
Password - 伺服器密碼
- 如果伺服器沒有設定密碼留空就好了
Language - 翻譯語言
- Google 支援的語言,默認當然是繁體中文囉…
Level - 難度
- 有 3 個難度可以選擇,Level 1 是最容易也是默認的選項
Auto translate - 換頁自動翻譯
- 決定換頁的時候是自動翻譯還是按鍵再翻譯
後記
當初花不少時間找免費的離線英漢字庫,翻譯出來的結果完全不行,後來由 App 改做插件的時候才發現這個因漏洞而可以免費使用的 Google Translate API,雖然它已經兩年沒更新了,但竟然還能夠使用,這讓我很驚訝